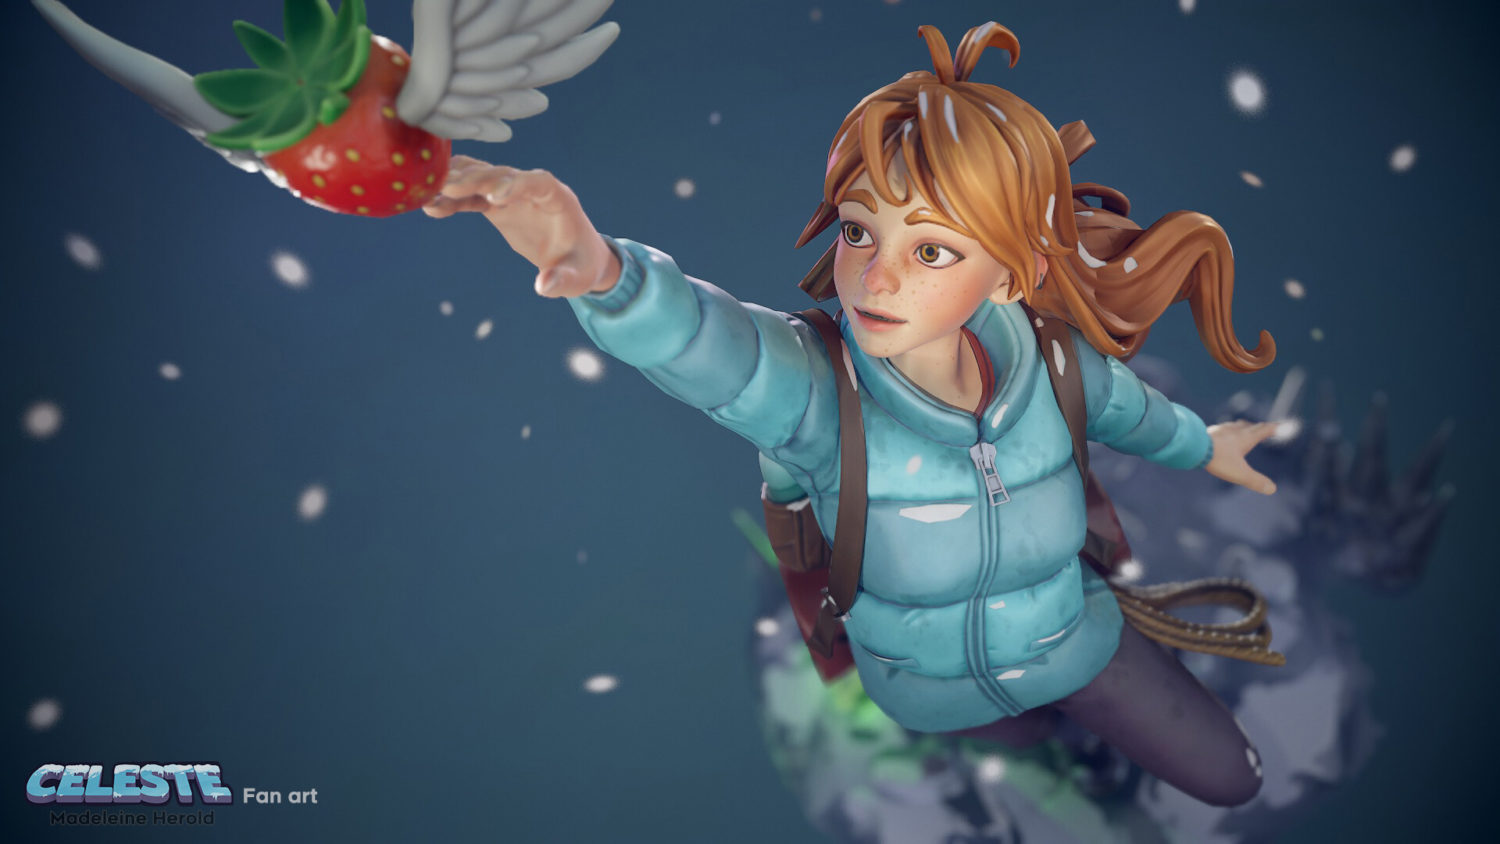
Some of you may have noticed how much we loved Madeleine Herold's model and render of her Celeste in-game namesake Madeline. As she listed RizomUV as one of her tools, we wanted to learn more about them both. We enjoyed listening to Madeleine's process so much, we decided to run her interview unabridged. So grab a coffee, sit back, and enjoy a little read about how she got where she is, and how she created Celeste's Madeline!
Currently based in Paris, working for Keos Masons, Madeleine told us: "I'm a French character artist who, like many others got started via gaming: For me, it started when I managed to convince my parents to get me a GameCube for Christmas. Video games quickly became one of my favourite hobbies, as well as something that fascinated me, as I discovered this world on my own. Apparently, my friends were not as hooked as I was.
I knew right away I wanted to be a part of this. I had no clue about 3D at the time, preferring to draw characters, but I got there in the end:
Fast forward some years, and I entered ISART, still determined to draw characters for a living. Alas, despite it being an amazing place, it did not work out for me, as I realised I was not all that good at drawing.
Like any other artist, I had a hard time coming to terms with this, but after some trial and error, I finally clicked with creating and working in 3D; I started at a new school, NEW3DGE art school.
Studying at New3dge started an amazing cycle for me, where I stopped gaming simply to create. The combination of how they teach, together with all the positive feedback I got, put me into a cycle of constant improvement and motivation, culminating in boosting my confidence and skills. I even got to study with Marco Plouffe a few weeks, as well as with, Cedric Seaut.
In fact, I got along so well with these two, that I joined their company, Keos Masons after graduating. The transition from being a student to being a triple-A game worker was a huge shock. Like any junior, I was extremely grateful for getting the job, but I was learning the ropes and anxious to do things right. It was pretty hard, but I ended up settling in and found a routine that worked for me."
W when it comes to my likes and dislikes in 3D, I think my favourite by far is texturing. It's one of the final steps in bringing your character to life, to tell their story, and hide easter eggs. I love it! I also love taking a step back from my work and seeing if it's going where I want it to. I do this while sculpting, as well as when texturing and rendering, it is really pleasant.
And the process above is why I think the worst part in 3D is when you know what you want to create, but don't know-how, and it can be a blocker, especially when you are trying out a new, unfamiliar style; I know what I want to tell, but not how?
Getting out of your comfort zone is obviously also scary. I usually don't enjoy it when starting out, but I find it very rewarding in the end.
And I'm not going to mention how boring retopology can be at times!
T oolwise, I use Zbrush for sculpting (of course), 3DS Max and 3D Coat for retopo, RizomUV for unwrapping (of course!), Substance Painter for texturing and I love rendering my personal art in Marmoset Toolbag.
I prefer 3DCoat for retopo, as I can use my tablet for that - using a mouse in other applications is so taxing on your wrist!
I also use Marmoset for baking Normal and AO passes, and sometimes the ID maps, as I think you have more control over the bake in Marmoset by painting the skew and the cage. I bake everything else in Substance, though, cause Substance's Smart Materials work best with Substance native bakes. Which is great, as Substance has everything for my texturing needs, regardless whether it's a stylistic or realistic render.
I use all the software above because these are the tools I ended up with after a lot of trial and error, trying to find the most efficient tools for the tasks I need to do. I have had to spend some time learning how they all worked, but I have a set of workflow tools that work for me - and that makes me work faster.
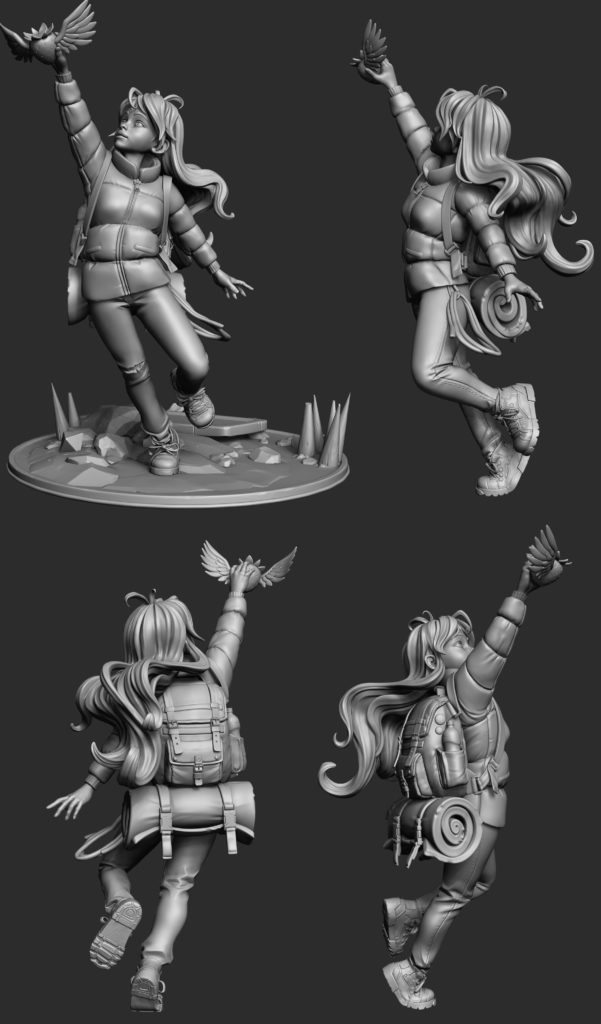
W when it comes to inspiration, I guess other people's art inspires me:
Video games are a big inspiration. That's how I got the idea for my latest and probably best personal project so far: Madeline! I have tons of video game fan-art ideas. Losing myself on Artstation is also a great way for me to find inspiration, there are so many talented people there. As for the fan-art ideas, I have my little folders with original concepts from random and very gifted artists as reference.
I also watch a lot of movies and series, and I try to go to the museum as often as I can. I have to admit that living in Paris helps a lot, there is so much to see here! Do not neglect classical art, it is a good and healthy source of inspiration. You can be amazed by what you find in museums.
What kills my buzz, on the other hand, is frustration; When I can't get the result I want, or when I spend too much time on an element that doesn't need it. Endless retopo. Reviews of tiny details from the client. Nothing different from most artists, I guess. I'm resilient, though! When I'm motivated, I finish my projects, even if it takes a lot of patience.
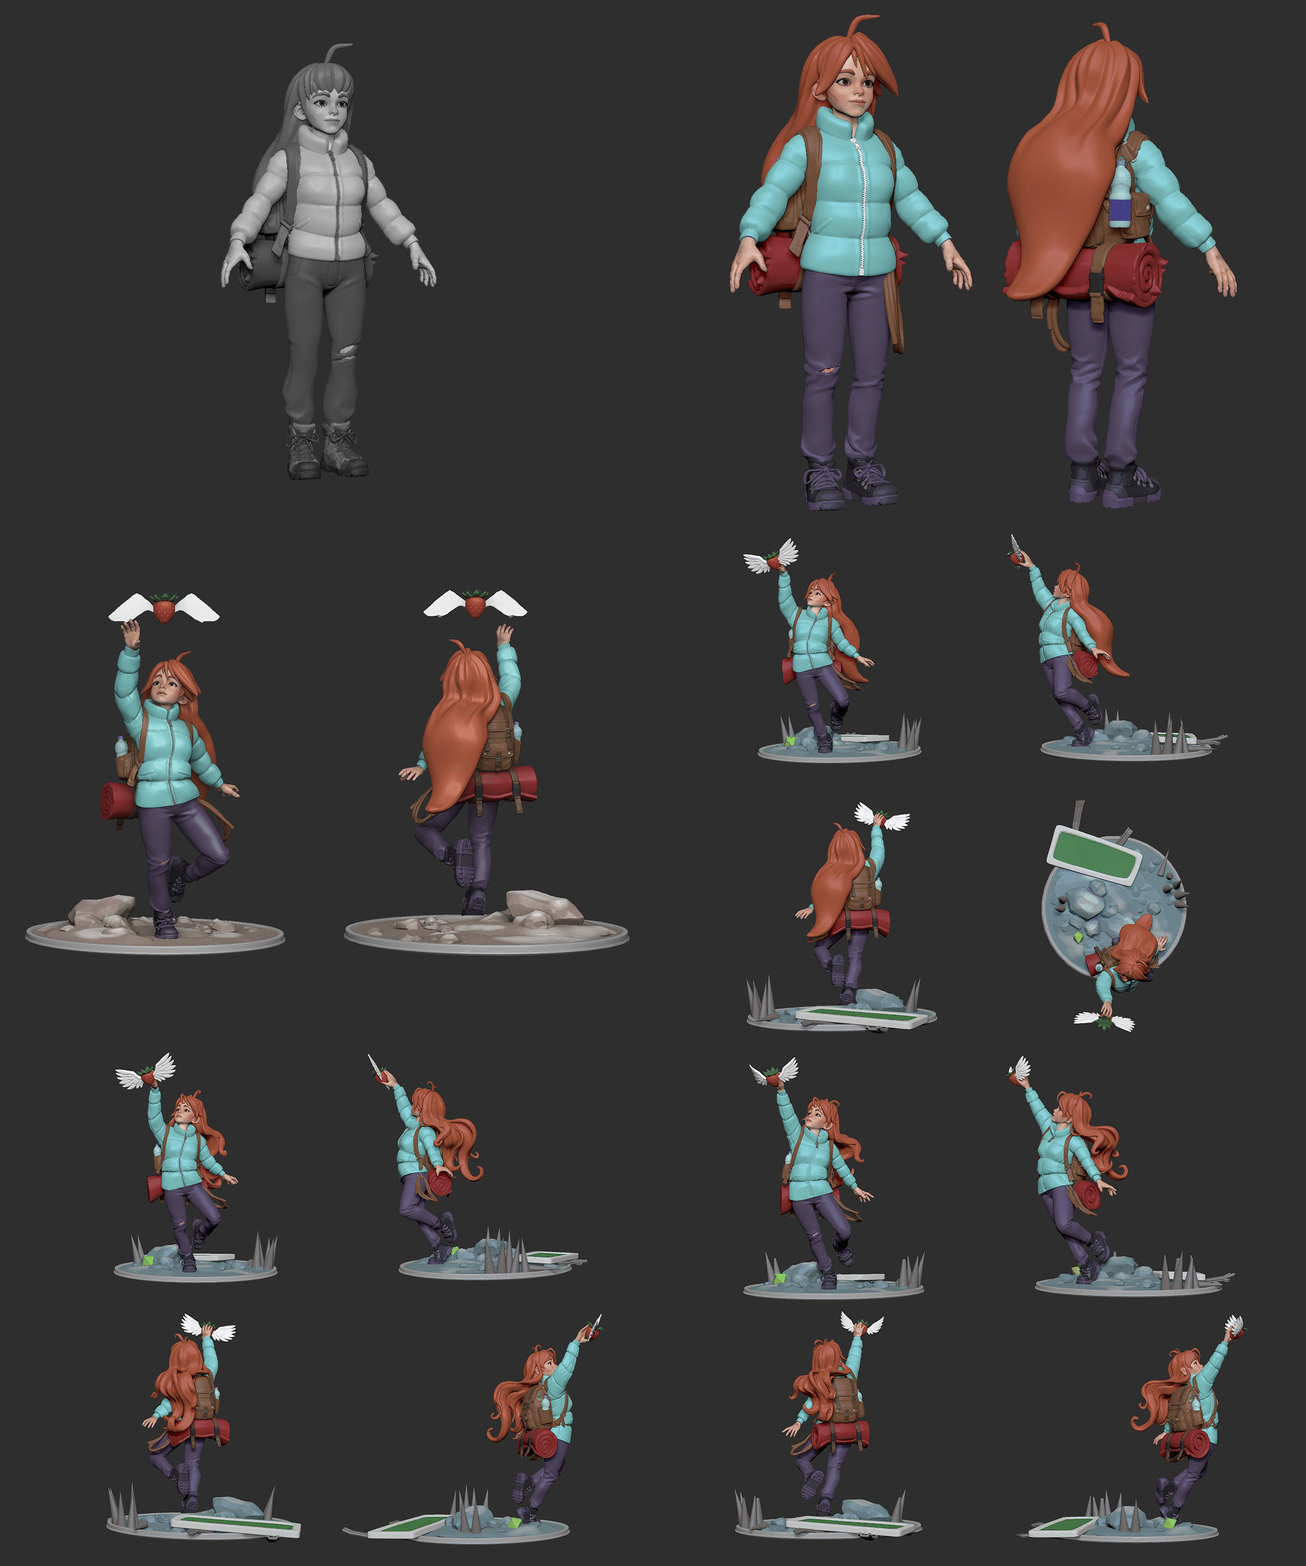
Iincidentally, I got the inspiration for creating Madeline about a year ago: I bought a game, Celeste, on Switch. I heard a lot of good things about it from friends and on the net. Not being a fan of try-hard games, I still gave it a try. And I loved the music and mood at first try! But as the game is SO hard, I wasn't into it at the start. I persisted, though, and got addicted. It was so rewarding and so well executed. The game made me enjoy challenging games a lot more, and of course, it made me want to sculpt Madeline. The game's beautiful artworks by Amora Bettany https://www.instagram.com/studiominiboss/ were also really inspiring.
As the game itself is in pixel art, I felt really free in how to interpret, and I just went for it. My goal was to have something not too far from Amora's artwork: I wanted a touch more realism, maybe. I really wanted to tell a story and make something cute
It also tied into my work habits: the absolute best way to work for me is in comfy pyjamas, with my cat sleeping not far from me, a cup of tea and relaxing video game music. I usually listen to metal (a lot), but when I have to focus, something soothing helps. Working from home is not always easy, but I love my little bubble of comfort. If I have to sculpt something difficult that I'm not used to, it is easier to take a step back and focus in a familiar and pleasant environment.
When the task is easy, I listen to audiobooks. When the task is tedious and doesn't need too much attention, I put a Netflix show on a side screen. It does help not dying of boredom getting long retopo-jobs done!
Madeline's workflow
When creating Madeline, the hardest thing was probably getting the face right; This is a struggle for me at the moment because, clearly, I don't sculpt enough faces - haha!. The hair wasn't very difficult to sculpt, but it required a lot of time and patience.
As Madeline doesn't carry many things, I knew if I wanted to do something with a punch, I had to think and be creative! That's why I put so much energy in the hair and on the pose. The pose itself needed to look good from every angle. It also needed to tell the viewer about the game's difficulty and Madeleine's journey of climbing Celeste Mountain, as well as mine. It was one of the biggest challenges in this piece, and I did not hesitate to ask for help from people around me to always get and to keep a fresh eye on it.
The easiest part was the pedestal I guess, it brought a little bit of background and framed the character with minimum effort.
People often ask what would have been differently if you had the time. Well, I actually had the time. I spent all the time I needed to make Madeline right, and the best I could. I tried to avoid putting pressure on myself, as my goal was to tell a story and make something beautiful. So I made the decision to not overthink it too much.
That said, I honestly think you have to give the proper amount of time to the things you're working on. Even if I did things quietly, at my own pace, I tried not to over-detail the parts that didn't need it. Taking a little step back quickly becomes a habit that you don't even think about anymore.
But after posting it, with the crits from my fellow artists and pure hindsight, I think I could have given Maddie a better face or facial expression.
Wworkflow-wise, when working on Madeline, at first, I wanted to use Rizom's automatic unwrap functionality on a decimated mesh. The idea was to go faster, by ignoring retopo and clean UV unwrapping, as the model was not made to be in any engine or game. All I wanted was a pretty Marmoset scene, not even a Marmoset viewer if it got too complicated with that decimated mesh. I ran some test-renders, tried unwrapping then baking with raw zremeshed or decimated parts, but it wasn't working. I got an okay-result, but I love really clean and neat work, and I could not stand all the small artefacts I was getting. I armed myself with patience again and completely retopologized the whole thing. I think it was worth it!
I made four 2048*2048 maps, unwrapped and neatly packed them thanks to Rizom. I unwrapped like any other character: As few cuts as possible and hiding the UV seams as much as possible. I bake with only 1 smoothing group, so I don't have to bother thinking about any other things while I cut my UVs. I tried to have my UV islands as flat as possible, especially for parts as the backpack's straps in case I wanted to add a pattern on Substance later or something like that.
I wanted to have something neat I didn't need to go back to before baking and texturing, and to have this step behind me and just move on.
I'm not sure about the tool or function I use the most in Rizom, but I can share my process.
I start by importing an FBX in Rizom, not the whole model but UV set by UV set. In this project, I separated my mesh in 6 sets: One for the skin, the hair, the strawberry and for the other things near her face, the backpack, the pedestal, and the whole body. I could easily have made less, but I wanted to have super-fine control over my UVs, and later my texturing.
I then isolate the pieces I work on: I select an island (hotkey is F4) and hide the rest (hotkey is I). I then switch to edge selection (F2) and use the Edge tool loop (B) and use it to select and cut my seams, and I always make an effort to cut them as hidden as possible. I unwrap them right away to see if my cuts pass muster. I then adjust if needed with Edit mode drag (F12) and/or with Optimize (O).
When it comes to certain difficult areas, like the face, I like to see what happens when I check Fill Holes and Overlaps to prevent… Overlaps. The shoelaces were hard too, because my retopo was absolutely awful -haha! And the hair because I wanted to hide my seams as much as possible that's a tricky thing to do. I tried to cut it following the big hair strands, and then pack the said strands in the same direction as flat as possible so I could add anisotropy to the hair later. Rizom made it easy, as it has a feature for that - it is the initial orientation: You can choose how you want your UV islands oriented: Horizontal, vertical or even at an angle, on an axis of your choice.
The other parts are pretty basic, and as I had a clean topology, it went quite fast.
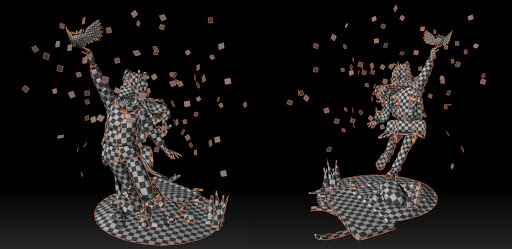
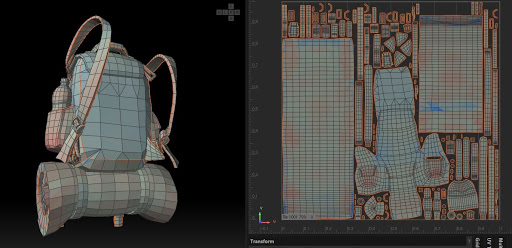

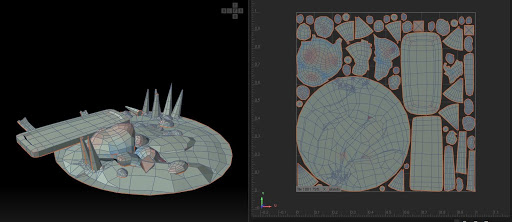
When I'm satisfied with my unwraps, I start packing. Rizom's algorithms are really out of this world, it's as close as perfection as an algorithm can get! It's the easiest part too: I start by making sure my texel ratio is fine by roughly re-packing everything with either Keep average or Follow average. As you can see - all I do is to tweak the default settings a little bit. I then reduce the size of the UV islands the viewers will never see to make room for the other, more important pieces.
And I'm ready for the final pack! I set the quality to Gold, have around 25 mutations, and of course, I don't forget to make sure to check Keep is set to the current scale, to avoid undoing my last step. If I don't care about my island orientations, I tick the 180 box to let Rizom orient them as it wants. In my opinion, Rizom packs its islands very close by default. I just have to tweak the spacing before pressing P and watch the magic happen. After that, I sometimes adjust an island or two, but the result always provides an excellent base from the get-go.
W hen done, I moved on to my final render. With a lot of anxiety - haha! When I started the project, one of my goals was to have a nice Marmoset scene, as I wanted to learn more about rendering. I put a lot of pressure on myself, and it even made me a bit apprehensive! Rendering is not my comfort zone. But I went ahead, and experimented with a basic 3 point lighting setup in Marmoset, tried adding lights here and there. It was a slow process, and I took my time getting to something I liked. Nothing was really easy as it was a learning process with a lot to learn. I think the hardest parts were to keep at it, as I'd already spent a lot of time on this project. It was also hard to decide the moment I was done and ready to post. This is a tough decision, as you don't have a deadline, you are doing this for yourself, and no one is expecting you to deliver your project like you do at work.
I have to say, I am really honoured by the success Madeline met! It warms my heart people liked my art, and it makes me want to keep going, and I hope sharing a bit of my process will help - even in a modest way- everyone that will read my words to create and express theirs.
Play Celeste, do whatever you have to do to be inspired and make art!

